Monday, October 3, 2011

Singly Linked List

example:
#include <iostream>

using namespace std;

class Node {
private:
Node(string s, Node* n);
string body;
Node* next;
friend class SinglyLinkedList;
};

Node::Node(string s, Node* n){
body = s;
next = n;
};

class SinglyLinkedList{
public:
SinglyLinkedList();
~SinglyLinkedList();
void AddInFront(string s);
void RemoveInFront();
void ShowAll();
private:
Node* head;
};

SinglyLinkedList::SinglyLinkedList(){
head = NULL;
};

SinglyLinkedList::~SinglyLinkedList(){
while (head != NULL){
RemoveInFront();
}
};

void SinglyLinkedList::AddInFront(string s){
Node* n = new Node(s, head);
head = n;
};

void SinglyLinkedList::RemoveInFront(){
if(head != NULL){
Node* tmp = head;
head = head->next;
delete tmp;
}
};

void SinglyLinkedList::ShowAll(){
Node* n = head;
while(n != NULL){
cout << n -> body << endl;
n = n -> next;
}
}

int main()
{
cout << "- Singly Linked List exercise -" << endl;

cout << "Create a new SinglyLinkedList: " << endl;
SinglyLinkedList mySinglyLinkedList;
mySinglyLinkedList.ShowAll();
cout << endl;

cout << "Remove nothing in a empty Singly Linked List: " << endl;
mySinglyLinkedList.RemoveInFront();
mySinglyLinkedList.ShowAll();
cout << endl;

cout << "Insert something: " << endl;
mySinglyLinkedList.AddInFront("ABC");
mySinglyLinkedList.AddInFront("DEFGH");
mySinglyLinkedList.AddInFront("I");
mySinglyLinkedList.AddInFront("JK");
mySinglyLinkedList.AddInFront("LMN");
mySinglyLinkedList.ShowAll();
cout << endl;

cout << "Remove something: " << endl;
mySinglyLinkedList.RemoveInFront();
mySinglyLinkedList.ShowAll();
cout << endl;

return 0;
}


Singly Linked List


Sort STL vector of C++

example:
#include <iostream>
#include <vector>
#include <cstdlib>
#include <algorithm>

using namespace std;

void showMyVector(const vector<int>& v);

int main()
{
vector<int> myVector;

cout << "Start with nothing" << endl;
showMyVector(myVector);

cout << "Insert something" << endl;
for (int i = 0; i < 10; i++) {
myVector.push_back(rand() % 100);
}
showMyVector(myVector);
cout << endl;

cout << "Sort the vector" << endl;
for (int i = 0; i < 10; i++) {
sort(myVector.begin(), myVector.end());
}
showMyVector(myVector);
cout << endl;

return 0;
}

void showMyVector(const vector<int>& v){
cout << "myVector.empty: " << v.empty() << endl;
cout << "myVector.size(): " << v.size() << endl;
for(unsigned i = 0; i < v.size(); i++){
cout << v[i] << " ";
}
cout << endl;
}


Sort STL vector of C++


Sunday, October 2, 2011

STL vector of C++

example:
#include <iostream>
#include <vector>

using namespace std;

void showMyVector(const vector<int>& v);

int main()
{
vector<int> myVector;

cout << "Start with nothing" << endl;
showMyVector(myVector);

cout << "Insert something" << endl;
myVector.push_back(0);
myVector.push_back(1);
myVector.push_back(2);
myVector.push_back(3);
myVector.push_back(4);
myVector.push_back(5);
myVector.insert(myVector.begin()+2, 9);
myVector.insert(myVector.end()-1, 10);
myVector.pop_back();
showMyVector(myVector);

cout << "Clear" << endl;
myVector.clear();
showMyVector(myVector);

return 0;
}

void showMyVector(const vector<int>& v){
cout << "myVector.empty: " << v.empty() << endl;
cout << "myVector.size(): " << v.size() << endl;
for(unsigned i = 0; i < v.size(); i++){
cout << v[i] << endl;
}
cout << endl;
}


STL vector of C++


Friday, September 30, 2011

Qt, a cross-platform application framework - updated version 1.1.3

Qt
The Qt SDK includes the tools you need to build desktop, embedded and mobile applications with Qt from a single install. This is the recommended way to get started with Qt. The latest SDK has a self updater feature that will keep you up to date as new versions are made available.

To align with the Nokia N9 release, Qt SDK updated version 1.1.3.

website: http://qt.nokia.com/


Wednesday, September 28, 2011

First exercise using Keil uVision 4 for 8051 micro-controller

It's easy to create a 8051 project using Keil 8051 Development Tools, uVision 4. You can also debug the program using the build-in simulator.

- New a uVision Project in uVision 4 IDE.
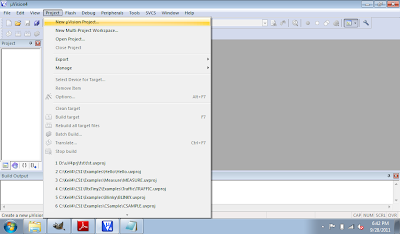
New a uVision Project

- Select project location and file name.
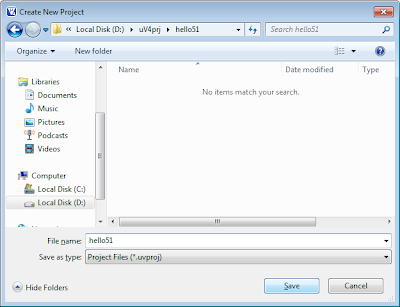
Select project location and file name

- Select 8051 (all Variants) under Generic in Data base, and click OK.
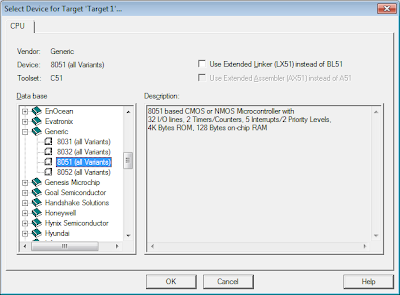
Select 8051 (all Variants)

- Accept Copy Standard 8051 Startup Code to Project Folder and Add File to Project. The IDE will copy STARTUP.A51 file for you.
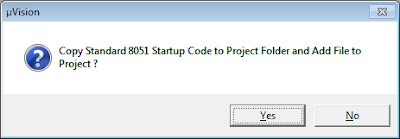
Copy Standard 8051 Startup Code to Project Folder and Add File to Project

- Right click th project "Target1" and select Options for Target 'Target1'...
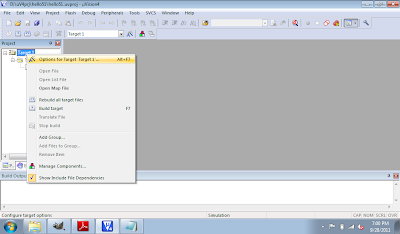
Select Options for Target

- Select Small Memory Model and Small Code Rom Size, and click OK.
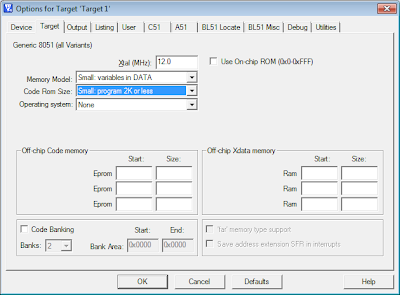
Config memory model

- Click File -> New... to creat your main.c

- Type in the program, and save it as main.c.
#include <reg51.h>

void DummyDelay();

void main(void){
char c = 0x00;
while(1){
P1 = c++;
DummyDelay();
}

}

void DummyDelay(){
unsigned char i, j;

for(i = 0; i < 0xFF; i++){
for(j = 0; j < 0xFF; j++){
}
}
}
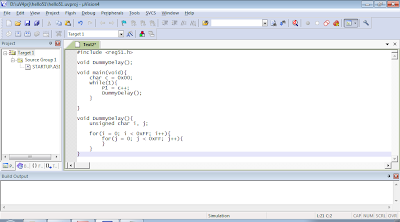
Edit the code

- Right click Source Group 1 under Target1 in Project, and Add Files to Group 'Source Group 1'...
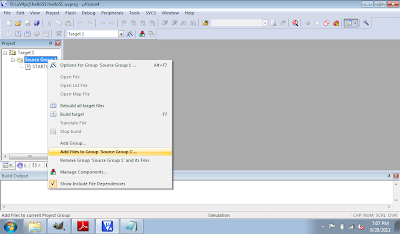
Add Files to Source Group

- Browse to select the main.c just created.
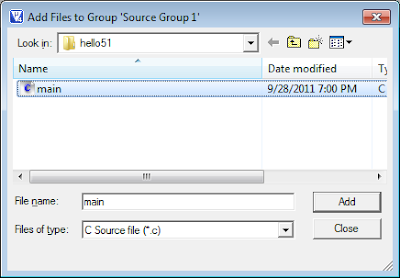
Add main.c

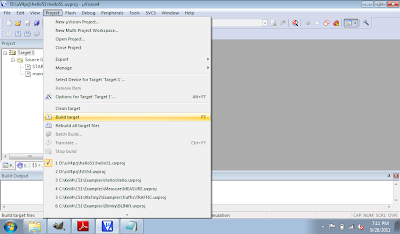
- Click Project to Build Target.
Build Target

- After finished without Errors. Click Debug and Start/Stop Debug Session.
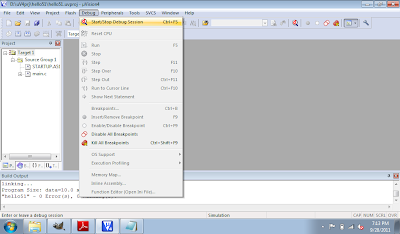
Start Debug Session

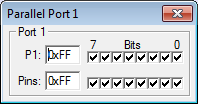
- Click Peripherals -> I/O - Ports -> Port 1 to open the Parallel Port 1 monitor window.
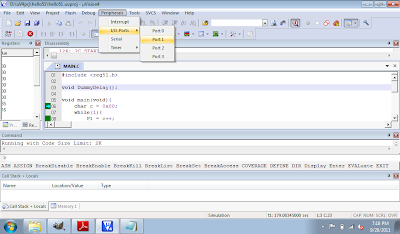
Open Port 1 Monitor
Port 1 Monitor

- Finally click on the Run icon, or F5, to run the program in simulated mode. You can see the Port 1 Bits in Parallel Port 1 monitor change while the program running.
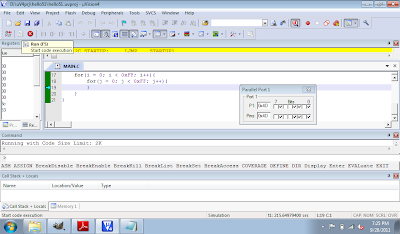
Running in Simulator

- Click Debug and Start/Stop Debug Session, or Ctrl-F5 to exit and back to edit mode.

Tuesday, September 27, 2011

Pointer and Array

In this exercise, an array of int and another array of char are created. On the other hand, a pointer to int and a pointer to char is defined. And then the pointers are assigned to the address of the arrays, and the elements of the array can be accessed by *(pointer + offset).

Pointer and Array

#include <iostream>

using namespace std;

const int LEN = 10;
int A_int[LEN];
int* ptA_int;
char A_char[LEN];
char* ptA_char;

int main()
{
cout << "Pointer and Array" << endl;

int i;
char c;

for (i = 0, c = 'a'; i < LEN; i++, c++){
A_int[i] = i;
A_char[i] = c;
cout << A_int[i] << "/" << A_char[i] << " ";
}
cout << endl;

ptA_int = A_int;
ptA_char = A_char;
for (i = 0; i < LEN; i++){
cout << *(ptA_int + i) << " ";
}
cout << endl;

for (i = 0; i < LEN; i++){
cout << *(ptA_char + i) << " ";
}
cout << endl;

return 0;
}


Keil 8051 Development Tools

The Keil 8051 Development Tools are designed to solve the complex problems facing embedded software developers.
  • When starting a new project, simply select the microcontroller you use from the Device Database and the µVision IDE sets all compiler, assembler, linker, and memory options for you.
  • Numerous example programs are included to help you get started with the most popular embedded 8051 devices.
  • The Keil µVision Debugger accurately simulates on-chip peripherals (I²C, CAN, UART, SPI, Interrupts, I/O Ports, A/D Converter, D/A Converter, and PWM Modules) of your 8051 device. Simulation helps you understand hardware configurations and avoids time wasted on setup problems. Additionally, with simulation, you can write and test applications before target hardware is available.
  • When you are ready to begin testing your software application with target hardware, use the MON51, MON390, MONADI, or FlashMON51 Target Monitors, the ISD51 In-System Debugger, or the ULINK USB-JTAG Adapter to download and test program code on your target system.

Overview of C51 Microcontrollers Development Tool


Download FREE Keil C51 Evaluation Kit
C51 Evaluation Tools Limitations
  • The 8051 compiler, assembler, linker, and debugger are limited to 2 Kbytes of object code. Source code may be of any size.
  • Programs that generate more than 2 Kbytes of object code will not compile, assemble, or link.
  • The debugger supports programs that are 2 Kbytes or smaller.
  • The startup code generated includes LJMPs. Code generated cannot be used in single-chip devices that support 2 Kbytes or less of program space.
  • Programs start at offset 0x0800. Programs generated with the evaluation software may not be programmed into single-chip devices with less than 2 Kbytes of on-chip ROM.
  • No hardware support for multiple DPTR registers is provided.
  • No support for floating-point arithmetic and no support for user libraries is provided.
  • No support for in-line assembly using #pragma ASM.
  • The following components which are present in the PK51 Full Version are not included in the Evaluation Version: Linker for Code Banking, Library Manager, and RTX51 Tiny Real-time Operating System.


Refer: First exercise using Keil uVision 4 for 8051 micro-controller