Friday, September 30, 2011
Qt, a cross-platform application framework - updated version 1.1.3
The Qt SDK includes the tools you need to build desktop, embedded and mobile applications with Qt from a single install. This is the recommended way to get started with Qt. The latest SDK has a self updater feature that will keep you up to date as new versions are made available.
To align with the Nokia N9 release, Qt SDK updated version 1.1.3.
website: http://qt.nokia.com/
標籤:
tools
Wednesday, September 28, 2011
First exercise using Keil uVision 4 for 8051 micro-controller
It's easy to create a 8051 project using Keil 8051 Development Tools, uVision 4. You can also debug the program using the build-in simulator.
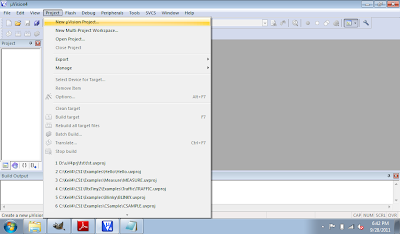
- New a uVision Project in uVision 4 IDE.
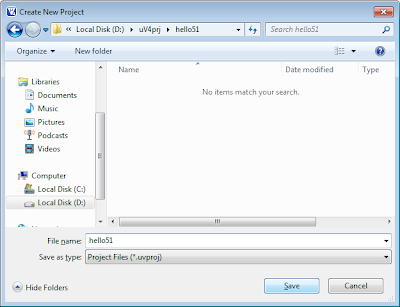
- Select project location and file name.
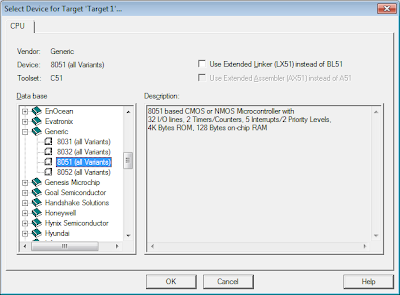
- Select 8051 (all Variants) under Generic in Data base, and click OK.
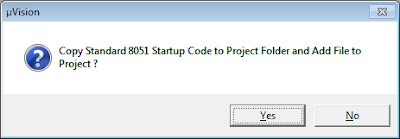
- Accept Copy Standard 8051 Startup Code to Project Folder and Add File to Project. The IDE will copy STARTUP.A51 file for you.
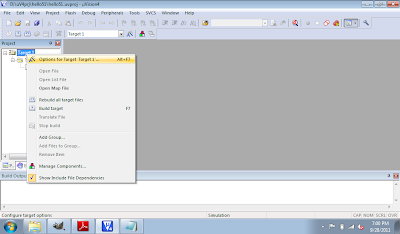
- Right click th project "Target1" and select Options for Target 'Target1'...
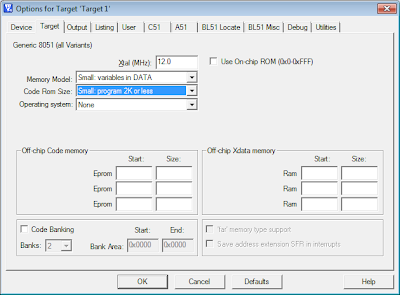
- Select Small Memory Model and Small Code Rom Size, and click OK.
- Click File -> New... to creat your main.c
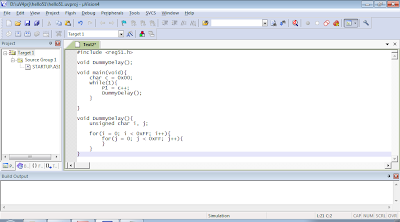
- Type in the program, and save it as main.c.
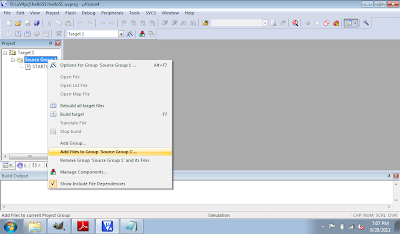
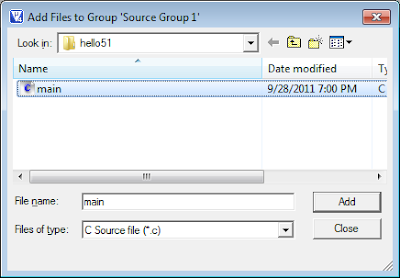
- Right click Source Group 1 under Target1 in Project, and Add Files to Group 'Source Group 1'...
- Browse to select the main.c just created.
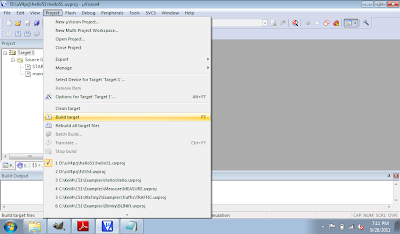
- Click Project to Build Target.
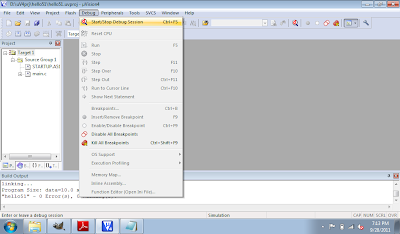
- After finished without Errors. Click Debug and Start/Stop Debug Session.
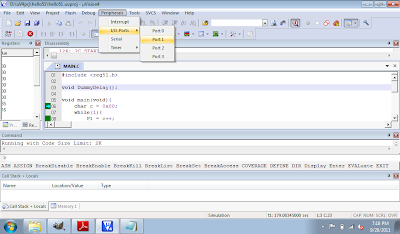
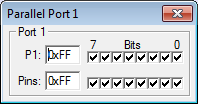
- Click Peripherals -> I/O - Ports -> Port 1 to open the Parallel Port 1 monitor window.
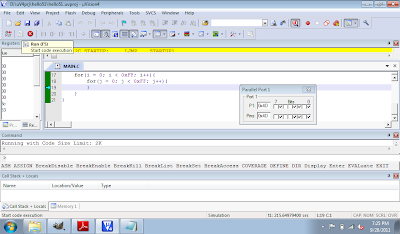
- Finally click on the Run icon, or F5, to run the program in simulated mode. You can see the Port 1 Bits in Parallel Port 1 monitor change while the program running.
- Click Debug and Start/Stop Debug Session, or Ctrl-F5 to exit and back to edit mode.
- New a uVision Project in uVision 4 IDE.
- Select project location and file name.
- Select 8051 (all Variants) under Generic in Data base, and click OK.
- Accept Copy Standard 8051 Startup Code to Project Folder and Add File to Project. The IDE will copy STARTUP.A51 file for you.
- Right click th project "Target1" and select Options for Target 'Target1'...
- Select Small Memory Model and Small Code Rom Size, and click OK.
- Click File -> New... to creat your main.c
- Type in the program, and save it as main.c.
#include <reg51.h>
void DummyDelay();
void main(void){
char c = 0x00;
while(1){
P1 = c++;
DummyDelay();
}
}
void DummyDelay(){
unsigned char i, j;
for(i = 0; i < 0xFF; i++){
for(j = 0; j < 0xFF; j++){
}
}
}
- Right click Source Group 1 under Target1 in Project, and Add Files to Group 'Source Group 1'...
- Browse to select the main.c just created.
- Click Project to Build Target.
- After finished without Errors. Click Debug and Start/Stop Debug Session.
- Click Peripherals -> I/O - Ports -> Port 1 to open the Parallel Port 1 monitor window.
- Finally click on the Run icon, or F5, to run the program in simulated mode. You can see the Port 1 Bits in Parallel Port 1 monitor change while the program running.
- Click Debug and Start/Stop Debug Session, or Ctrl-F5 to exit and back to edit mode.
Tuesday, September 27, 2011
Pointer and Array
In this exercise, an array of int and another array of char are created. On the other hand, a pointer to int and a pointer to char is defined. And then the pointers are assigned to the address of the arrays, and the elements of the array can be accessed by *(pointer + offset).
#include <iostream>
using namespace std;
const int LEN = 10;
int A_int[LEN];
int* ptA_int;
char A_char[LEN];
char* ptA_char;
int main()
{
cout << "Pointer and Array" << endl;
int i;
char c;
for (i = 0, c = 'a'; i < LEN; i++, c++){
A_int[i] = i;
A_char[i] = c;
cout << A_int[i] << "/" << A_char[i] << " ";
}
cout << endl;
ptA_int = A_int;
ptA_char = A_char;
for (i = 0; i < LEN; i++){
cout << *(ptA_int + i) << " ";
}
cout << endl;
for (i = 0; i < LEN; i++){
cout << *(ptA_char + i) << " ";
}
cout << endl;
return 0;
}
標籤:
exercise
Keil 8051 Development Tools
The Keil 8051 Development Tools are designed to solve the complex problems facing embedded software developers.
Download FREE Keil C51 Evaluation Kit
Refer: First exercise using Keil uVision 4 for 8051 micro-controller
- When starting a new project, simply select the microcontroller you use from the Device Database and the µVision IDE sets all compiler, assembler, linker, and memory options for you.
- Numerous example programs are included to help you get started with the most popular embedded 8051 devices.
- The Keil µVision Debugger accurately simulates on-chip peripherals (I²C, CAN, UART, SPI, Interrupts, I/O Ports, A/D Converter, D/A Converter, and PWM Modules) of your 8051 device. Simulation helps you understand hardware configurations and avoids time wasted on setup problems. Additionally, with simulation, you can write and test applications before target hardware is available.
- When you are ready to begin testing your software application with target hardware, use the MON51, MON390, MONADI, or FlashMON51 Target Monitors, the ISD51 In-System Debugger, or the ULINK USB-JTAG Adapter to download and test program code on your target system.
Download FREE Keil C51 Evaluation Kit
C51 Evaluation Tools Limitations
- The 8051 compiler, assembler, linker, and debugger are limited to 2 Kbytes of object code. Source code may be of any size.
- Programs that generate more than 2 Kbytes of object code will not compile, assemble, or link.
- The debugger supports programs that are 2 Kbytes or smaller.
- The startup code generated includes LJMPs. Code generated cannot be used in single-chip devices that support 2 Kbytes or less of program space.
- Programs start at offset 0x0800. Programs generated with the evaluation software may not be programmed into single-chip devices with less than 2 Kbytes of on-chip ROM.
- No hardware support for multiple DPTR registers is provided.
- No support for floating-point arithmetic and no support for user libraries is provided.
- No support for in-line assembly using #pragma ASM.
- The following components which are present in the PK51 Full Version are not included in the Evaluation Version: Linker for Code Banking, Library Manager, and RTX51 Tiny Real-time Operating System.
Refer: First exercise using Keil uVision 4 for 8051 micro-controller
Monday, September 26, 2011
Implement Insertion sort in C/C++
Insertion sort is a simple sorting algorithm: a comparison sort in which the sorted array (or list) is built one entry at a time. It is much less efficient on large lists than more advanced algorithms such as quicksort, heapsort, or merge sort.
#include <iostream>
#include <cstdlib>
using namespace std;
void InsertionSort(int* ar, int len);
const int LENGTH = 10;
int data[LENGTH];
int main()
{
//Prepare data
for (int i = 0; i < 10; i++) {
data[i] = rand() % 100;
}
cout << "data before Insertion Sort:" << endl;
for (int i = 0; i < 10; i++)
cout << data[i] << " ";
cout << endl << endl;
InsertionSort(data, LENGTH);
cout << endl << "data before Insertion Sort:" << endl;
for (int i = 0; i < 10; i++)
cout << data[i] << " ";
cout << endl;
return 0;
}
void InsertionSort(int* ar, int len){
int cur, j;
for (int i = 1; i < len; i++) {
cur = ar[i];
j = i - 1;
while ((j >= 0) && (ar[j] > cur)) {
ar[j + 1] = ar[j];
j--;
}
ar[j + 1] = cur;
for (int ii = 0; ii < 10; ii++)
cout << ar[ii] << " ";
cout << endl;
}
}
標籤:
exercise
Sunday, September 25, 2011
Create HelloWorld Windows Form Application, using Visual C++ 2010 Express
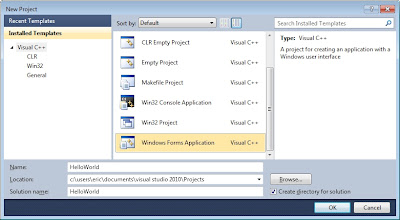
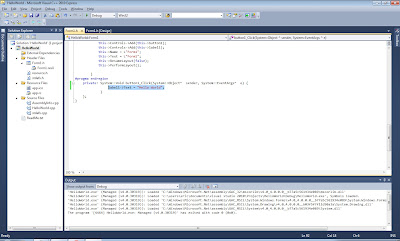
- Create New Project using template of Visual C++ Windows Form Application, with Name of "HelloWorld", and click OK.
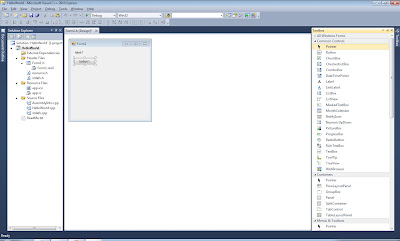
- Click on "Toolbox" on right to expand Toolbox, drag a label and button over the Form.
- Double Click on the button, to generate the code of button1_Click() method. Visual C++ will open the code designer for you.
- Add the code inside button1_Click() method:
- Save and Run.
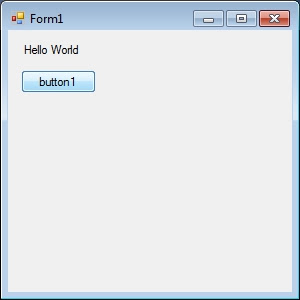
Click on the button, the text on the label will be changed to "Hello World".
- Create New Project using template of Visual C++ Windows Form Application, with Name of "HelloWorld", and click OK.
- Click on "Toolbox" on right to expand Toolbox, drag a label and button over the Form.
- Double Click on the button, to generate the code of button1_Click() method. Visual C++ will open the code designer for you.
- Add the code inside button1_Click() method:
private: System::Void button1_Click(System::Object^ sender, System::EventArgs^ e) {
label1->Text = "Hello World";
}
};
- Save and Run.
Click on the button, the text on the label will be changed to "Hello World".
FREE NetBeans IDE
The NetBeans IDE is an award-winning integrated development environment available for Windows, Mac, Linux, and Solaris. The NetBeans project consists of an open-source IDE and an application platform that enable developers to rapidly create web, enterprise, desktop, and mobile applications using the Java platform, as well as PHP, JavaScript and Ajax, Groovy and Grails, and C/C++.
NetBeans web site: http://netbeans.org/
標籤:
tools
Thursday, September 22, 2011
Windows Runtime internals: understanding "Hello World"
The Windows Runtime is a key piece of technology used by all Metro style apps in Windows. How exactly does it work though? You too can become a Windows Runtime Expert by taking a deep dive into the internals of the Windows Runtime using not much more than a new project in Visual Studio and a debugger. After this talk, you will understand how A "Hello World" Metro style app uses the Windows Runtime, enabling you to build better apps.
Sunday, September 18, 2011
Virtual Function and Virtual Destructor
Consider the case: There is a base class BASE, and a derived class DERIVED. Both have a member function getInfo(). It's a array of pointer to BASE object. Because object of DERIVED "is a" BASE object also, so it can be pointed by the array.
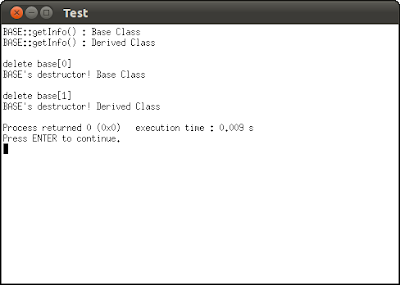
When we call the getInfo() function of DERIVED object pointed by a pointer to BASE, which function will be called? BASE::getInfo()? or DERIVED::getInfo()? - The answer is BASE::getInfo()!
It's also happen on the destructor, when we delete a DERIVED object pointed by a pointer to BASE, the destructor of BASE will be called.
It's called static binding.
To solve this problem, we can define both the getInfo() and destructor as virtual, to specify dynamic binding on the functions.
When we call the getInfo() function of DERIVED object pointed by a pointer to BASE, which function will be called? BASE::getInfo()? or DERIVED::getInfo()? - The answer is BASE::getInfo()!
It's also happen on the destructor, when we delete a DERIVED object pointed by a pointer to BASE, the destructor of BASE will be called.
It's called static binding.
#include <iostream>
using namespace std;
class BASE{
public:
BASE(int x, int y, int z);
~BASE();
void getInfo();
int a;
protected:
int b;
string Im;
private:
int c;
};
BASE::BASE(int x, int y, int z)
:a(x), b(y), c(z){
Im = "Base Class";
}
BASE::~BASE(){
cout << "BASE's destructor! " << Im << endl;
}
void BASE::getInfo(){
cout << "BASE::getInfo()" << " : " << Im << endl;
}
class DERIVED:public BASE{
public:
DERIVED(int x, int y, int z, int w);
~DERIVED();
void getInfo();
private:
int d;
};
DERIVED::DERIVED(int x, int y, int z, int w)
:BASE(x, y, z), d(w){
Im = "Derived Class";
}
DERIVED::~DERIVED(){
cout << "DERIVED's destructor! " << Im << endl;
}
void DERIVED::getInfo(){
cout << "DERIVED::getInfo()" << " : " << Im << endl;
}
int main()
{
BASE* base[2];
base[0] = new BASE(1, 2, 3);
base[1] = new DERIVED(4, 5, 6, 7);
base[0]->getInfo();
base[1]->getInfo();
cout << endl;
cout << "delete base[0]" << endl;
delete base[0];
cout << endl;
cout << "delete base[1]" << endl;
delete base[1];
return 0;
}
To solve this problem, we can define both the getInfo() and destructor as virtual, to specify dynamic binding on the functions.
#include <iostream>
using namespace std;
class BASE{
public:
BASE(int x, int y, int z);
virtual ~BASE();
virtual void getInfo();
int a;
protected:
int b;
string Im;
private:
int c;
};
BASE::BASE(int x, int y, int z)
:a(x), b(y), c(z){
Im = "Base Class";
}
BASE::~BASE(){
cout << "BASE's destructor! " << Im << endl;
}
void BASE::getInfo(){
cout << "BASE::getInfo()" << " : " << Im << endl;
}
class DERIVED:public BASE{
public:
DERIVED(int x, int y, int z, int w);
virtual ~DERIVED();
virtual void getInfo();
private:
int d;
};
DERIVED::DERIVED(int x, int y, int z, int w)
:BASE(x, y, z), d(w){
Im = "Derived Class";
}
DERIVED::~DERIVED(){
cout << "DERIVED's destructor! " << Im << endl;
}
void DERIVED::getInfo(){
cout << "DERIVED::getInfo()" << " : " << Im << endl;
}
int main()
{
BASE* base[2];
base[0] = new BASE(1, 2, 3);
base[1] = new DERIVED(4, 5, 6, 7);
base[0]->getInfo();
base[1]->getInfo();
cout << endl;
cout << "delete base[0]" << endl;
delete base[0];
cout << endl;
cout << "delete base[1]" << endl;
delete base[1];
return 0;
}
標籤:
exercise
Writing modern C++ code - How C++ has evolved over the years
In this talk, Microsoft's C++ architect and chair of the ISO C++ standards committee Herb Sutter will showcase upcoming innovations in Visual C++ that show the Windows Runtime as a core part of native development. Windows 8 comes packed with rich APIs that are all Windows Runtime based, and C++ continues to deliver the tools you need to achieve the power and performance you have come to expect. Join us for a technical session that will serve as an overview of the new C++ programming model for the Windows Runtime and a prerequisite to other C++ sessions.
Download Microsoft® Visual Studio® 11 Developer Preview
Visual Studio 11 Developer Preview is an integrated development environment that seamlessly spans the entire life cycle of software creation, including architecture, user interface design, code creation, code insight and analysis, code deployment, testing, and validation.
Visual Studio 11 Developer Preview is an integrated development environment that seamlessly spans the entire life cycle of software creation, including architecture, user interface design, code creation, code insight and analysis, code deployment, testing, and validation. This release adds support for the most advanced Microsoft platforms, including the next version of Windows (code-named "Windows 8") and Windows Azure, and enables you to target platforms across devices, services, and the cloud. Integration with Team Foundation Server allows the entire team, from the customer to the developer, to build scalable and high-quality applications to exacting standards and requirements.
Visual Studio 11 Developer Preview is prerelease software and should not be used in production scenarios.
This preview can be installed to run side by side with an existing Visual Studio 2010 installation.
Note: This prerelease software will expire on June 30, 2012. To continue using Visual Studio 11 after that date, you will have to install a later version of the software.
Link: - Microsoft Download Center: Microsoft® Visual Studio® 11 Developer Preview (Web Installer)
Saturday, September 17, 2011
Constructor and Destructor of derived Class
Example of Constructor and Destructor of derived Class:
#include <iostream>
using namespace std;
class BASE{
public:
BASE(int x, int y, int z);
~BASE();
void doit();
int a;
protected:
int b;
string Im;
private:
int c;
};
BASE::BASE(int x, int y, int z)
:a(x), b(y), c(z){
Im = "Base Class";
}
BASE::~BASE(){
cout << "BASE's destructor! " << Im << endl;
}
void BASE::doit(){
cout << "BASE::doit()" << endl;
cout << a << endl;
cout << b << endl;
cout << c << endl;
}
class DERIVED:public BASE{
public:
DERIVED(int x, int y, int z, int w);
~DERIVED();
void doit();
private:
int d;
};
DERIVED::DERIVED(int x, int y, int z, int w)
:BASE(x, y, z), d(w){
Im = "Derived Class";
}
DERIVED::~DERIVED(){
cout << "DERIVED's destructor! " << Im << endl;
}
void DERIVED::doit(){
cout << "DERIVED::doit()" << endl;
BASE::doit();
cout << d << endl;
}
int main()
{
BASE base(1, 2, 3);
base.doit();
DERIVED derived(4, 5, 6, 7);
derived.doit();
return 0;
}
標籤:
exercise
Derived class cannot access private area of base class
example:
#include <iostream>
using namespace std;
class BASE{
public:
void doit();
int a;
protected:
int b;
private:
int c;
};
class DERIVED:public BASE{
public:
void doit();
};
void BASE::doit(){
cout << "BASE::doit()" << endl;
cout << a << endl;
cout << b << endl;
cout << c << endl;
};
void DERIVED::doit(){
cout << "DERIVED::doit()" << endl;
BASE::doit();
cout << "---" << endl;
cout << a << endl;
cout << b << endl;
cout << c << endl; //ERROR: cannot access private of base class
}
int main()
{
BASE base;
base.doit();
DERIVED derived;
derived.doit();
return 0;
}
標籤:
exercise
Some function examples of STD string
example:
#include <iostream>
using namespace std;
string std_string;
int main()
{
cout << "STD String Test" << endl << endl;
std_string = "We wish you a merry Christmas and a Happy New Year!";
cout << "std_string = " << std_string << endl;
cout << "std_string.find(\"Christmas\") = " << std_string.find("Christmas") << endl;
cout << "std_string.substr(20, 9) = " << std_string.substr(20, 9) << endl;
cout << "std_string.insert(20, \"2011\") = " << std_string.insert(20, "2011 ") << endl;
cout << "std_string.erase(20, 5) = " << std_string.erase(20, 5) << endl;
cout << "std_string.replace(20, 6, \"X'\") = " << std_string.replace(20, 6, "X'") << endl;
return 0;
}
標籤:
exercise
friend class
In definded friend class, it can access private data.
example:
example:
#include <iostream>
using namespace std;
class MyClass{
public:
MyClass(const int mSize);
MyClass(MyClass& src);
~MyClass();
void fill(char c);
void getInfo();
MyClass& operator=(const MyClass& src);
private:
int size;
char* ptToChar;
friend class MyFriend;
};
//Constructor with default size
MyClass::MyClass(const int mSize = 10)
{
size = mSize;
ptToChar = new char[size];
}
//Copy Constructor
MyClass::MyClass(MyClass& src){
size = src.size;
ptToChar = new char[size];
for(int i = 0; i < size; i++)
ptToChar[i] = src.ptToChar[i];
}
MyClass::~MyClass(){
cout << "MyClass Destructor: " << endl;
}
void MyClass::fill(char c){
for(int i = 0; i < size; i++)
ptToChar[i] = c;
}
void MyClass::getInfo()
{
cout << "size: " << size << endl;
for(int i = 0; i < size; i++)
cout << ptToChar[i];
cout << endl;
}
//Overload operator =
MyClass& MyClass::operator=(const MyClass& src){
if (this != &src){
delete[] ptToChar;
size = src.size;
ptToChar = new char[size];
for(int i = 0; i < size; i++)
ptToChar[i] = src.ptToChar[i];
}
return *this;
}
class MyFriend{
public:
void getFriendInfo(const MyClass& myfriend);
};
void MyFriend::getFriendInfo(const MyClass& myfriend){
cout << "size: " << myfriend.size << endl;
for(int i = 0; i < myfriend.size; i++)
cout << myfriend.ptToChar[i];
cout << endl;
}
int main()
{
MyClass myClass1(20);
myClass1.fill('A');
myClass1.getInfo();
MyClass myClass2(10);
myClass2 = myClass1;
myClass2.getInfo();
myClass1.fill('B');
myClass1.getInfo();
myClass2.getInfo();
cout << endl << "Create MyFriend friendA()" << endl;
MyFriend friendA;
friendA.getFriendInfo(myClass1);
friendA.getFriendInfo(myClass2);
return 0;
}
標籤:
exercise
Overloading operator "=" for class with "new" object
Similar to the case in "using default Copy Constructor, when Class new some data". If we assign a object using "new" data inside, it will create a memory leak: because the default "=" operate assign the pointer to new value, without deleting the old data.
Here is a example to overloading operator "=":
#include <iostream>
using namespace std;
class MyClass{
public:
MyClass(const int mSize);
MyClass(MyClass& src);
~MyClass();
void fill(char c);
void getInfo();
MyClass& operator=(const MyClass& src);
private:
int size;
char* ptToChar;
};
//Constructor with default size
MyClass::MyClass(const int mSize = 10)
{
size = mSize;
ptToChar = new char[size];
}
//Copy Constructor
MyClass::MyClass(MyClass& src){
size = src.size;
ptToChar = new char[size];
for(int i = 0; i < size; i++)
ptToChar[i] = src.ptToChar[i];
}
MyClass::~MyClass(){
cout << "MyClass Destructor: " << endl;
}
void MyClass::fill(char c){
for(int i = 0; i < size; i++)
ptToChar[i] = c;
}
void MyClass::getInfo()
{
cout << "size: " << size << endl;
for(int i = 0; i < size; i++)
cout << ptToChar[i];
cout << endl;
}
//Overload operator =
MyClass& MyClass::operator=(const MyClass& src){
if (this != &src){
delete[] ptToChar;
size = src.size;
ptToChar = new char[size];
for(int i = 0; i < size; i++)
ptToChar[i] = src.ptToChar[i];
}
return *this;
}
int main()
{
MyClass myClass1(20);
myClass1.fill('A');
myClass1.getInfo();
MyClass myClass2(10);
myClass2 = myClass1;
myClass2.getInfo();
myClass1.fill('B');
myClass1.getInfo();
myClass2.getInfo();
return 0;
}
標籤:
exercise
Friday, September 16, 2011
Using the Windows Runtime from C++
In this talk, Microsoft's C++ architect and chair of the ISO C++ standards committee Herb Sutter will showcase upcoming innovations in Visual C++ that show the Windows Runtime as a core part of native development. Windows 8 comes packed with rich APIs that are all Windows Runtime based, and C++ continues to deliver the tools you need to achieve the power and performance you have come to expect. Join us for a technical session that will serve as an overview of the new C++ programming model for the Windows Runtime and a prerequisite to other C++ sessions.
Visual Studio 11 Express
Microsoft Visual Studio 11 Express for Windows Developer Preview is a collection of tools that you can use to create, code, debug, localize, package, and deploy a Metro style app. In short, Visual Studio can help you do just about anything you need to do to develop a Metro style app.
know more: First look at Visual Studio 11 Express
Thursday, September 15, 2011
MDK-ARM Microcontroller Development Kit
The MDK-ARM is a complete software development environment for Cortex™-M, Cortex-R4, ARM7™ and ARM9™ processor-based devices. MDK-ARM is specifically designed for microcontroller applications, it is easy to learn and use, yet powerful enough for the most demanding embedded applications.
MDK-ARM is available in four editions: MDK-Lite, MDK-Basic, MDK-Standard, and MDK-Professional. All editions provide a complete C/C++ development environment and MDK-Professional includes extensive middleware libraries. MDK-Lite (32KB) Edition is available for download. It does not require a serial number or license key.
Details: http://www.keil.com/arm/mdk.asp
Wednesday, September 14, 2011
Download Windows Developer Preview and free developer tools
- Windows Developer Preview with developer tools English, 64-bit (x64)
- Windows Developer Preview English, 64-bit (x64)
- Windows Developer Preview English, 32-bit (x86)
Details.
- 64-bit Windows Developer Preview
- Windows SDK for Metro style apps
- Microsoft Visual Studio 11 Express for Windows Developer Preview
- Microsoft Expression Blend 5 Developer Preview
- 28 Metro style apps including the BUILD Conference app
- Windows Developer Preview English, 64-bit (x64)
- Windows Developer Preview English, 32-bit (x86)
Details.
Tuesday, September 13, 2011
new data in Copy Constructor
Refer to the Problem of using default Copy Constructor, when Class new some data, we can provide our own copy constructor to solve the problem:
#include <iostream>
using namespace std;
class MyClass{
public:
MyClass(const int mSize);
MyClass(MyClass& src);
~MyClass();
void fill(char c);
void getInfo();
private:
int size;
char* ptToChar;
};
//Constructor with default size
MyClass::MyClass(const int mSize = 10)
{
size = mSize;
ptToChar = new char[size];
}
//Copy Constructor
MyClass::MyClass(MyClass& src){
size = src.size;
ptToChar = new char[size];
for(int i = 0; i < size; i++)
ptToChar[i] = src.ptToChar[i];
}
MyClass::~MyClass(){
cout << "MyClass Destructor: " << endl;
}
void MyClass::fill(char c){
for(int i = 0; i < size; i++)
ptToChar[i] = c;
}
void MyClass::getInfo()
{
cout << "size: " << size << endl;
for(int i = 0; i < size; i++)
cout << ptToChar[i];
cout << endl;
}
int main()
{
MyClass myClass1(20);
myClass1.fill('A');
myClass1.getInfo();
MyClass myClass2(myClass1); //Using our Copy Constructor
myClass2.getInfo();
myClass1.fill('B');
myClass1.getInfo();
myClass2.getInfo();
return 0;
}
標籤:
exercise
Problem of using default Copy Constructor, when Class new some data
In case of there are some data is created in a class using new, if we create another new object using compiler auto generated default copy constructor; the default copy constructor copy the pointer only, without create the new data. Both object have the same data, such that changing the data in one object will affect in the another object.
It's a example:
we can provide our own copy constructor to solve the problem.
It's a example:
#include <iostream>
using namespace std;
class MyClass{
public:
MyClass(const int mSize);
~MyClass();
void fill(char c);
void getInfo();
private:
int size;
char* ptToChar;
};
//Constructor with default size
MyClass::MyClass(const int mSize = 10)
{
size = mSize;
ptToChar = new char[size];
}
MyClass::~MyClass(){
cout << "MyClass Destructor: " << endl;
}
void MyClass::fill(char c){
for(int i = 0; i < size; i++)
ptToChar[i] = c;
}
void MyClass::getInfo()
{
cout << "size: " << size << endl;
for(int i = 0; i < size; i++)
cout << ptToChar[i];
cout << endl;
}
int main()
{
MyClass myClass1;
myClass1.fill('A');
myClass1.getInfo();
MyClass myClass2(myClass1); //Using default Copy Constructor
myClass2.getInfo();
/*
* Both myClass1.ptToChar and myClass2.ptToChar point to
* the same char[size], such that fill in myClass1 affect
* the array also!!!
*/
myClass1.fill('B');
myClass2.getInfo();
return 0;
}
we can provide our own copy constructor to solve the problem.
標籤:
exercise
Constructor with initializer list
example:
#include <iostream>
using namespace std;
class MyClass{
public:
MyClass();
~MyClass();
private:
string myName;
string myNote;
};
//Constructor with initializer list
MyClass::MyClass()
:myName("initName"), myNote("initNote")
{
cout << "MyClass Constructor: " << myName << endl;
}
MyClass::~MyClass(){
cout << "MyClass Destructor: " << myName << endl;
}
int main()
{
MyClass myClass1;
return 0;
}
Compiler auto-generated Copy Constructor
If you don’t write your own copy constructor, the compiler generate a defaut one for you, to copy member variables one-by-one.
example:
example:
#include <iostream>
using namespace std;
class MyClass{
public:
MyClass();
MyClass(string note, const string mName = "DEFAULT_NAME");
~MyClass();
private:
string myName;
string myNote;
};
MyClass::MyClass(){
myName = "default constructor without argument";
myNote = "";
cout << "MyClass Constructor: " << myName << endl;
}
MyClass::MyClass(string note, const string mName){
myName = mName;
myNote = note;
cout << "MyClass Constructor: " << myName << " : " << myNote << endl;
}
MyClass::~MyClass(){
cout << "MyClass Destructor: " << myName << endl;
}
int main()
{
MyClass myClass1;
MyClass myClass2("Using default Name");
MyClass myClass3("with name", "MyClass 3");
MyClass copyClass(myClass3);
return 0;
}
標籤:
exercise
Copy Constructor
A copy constructor is one that takes a single argument of the same type as the class, passed by reference. Such that you can copy member variable from another object of the same class.
example:
Related Post:
- Compiler auto-generated Copy Constructor
example:
#include <iostream>
using namespace std;
class MyClass{
public:
MyClass();
MyClass(string note, const string mName = "DEFAULT_NAME");
MyClass(MyClass& src); //Copy Constructor
~MyClass();
private:
string myName;
string myNote;
};
MyClass::MyClass(){
myName = "default constructor without argument";
myNote = "";
cout << "MyClass Constructor: " << myName << endl;
}
//Copy Constructor
MyClass::MyClass(MyClass& src){
myName = src.myName;
myNote = src.myNote;
cout << "Copy Constructor: " << myName << " : " << myNote << endl;
}
MyClass::MyClass(string note, const string mName){
myName = mName;
myNote = note;
cout << "MyClass Constructor: " << myName << " : " << myNote << endl;
}
MyClass::~MyClass(){
cout << "MyClass Destructor: " << myName << endl;
}
int main()
{
MyClass myClass1;
MyClass myClass2("Using default Name");
MyClass myClass3("with name", "MyClass 3");
MyClass copyClass(myClass3);
return 0;
}
Related Post:
- Compiler auto-generated Copy Constructor
標籤:
exercise
Constructor with default argument
example:
#include <iostream>
using namespace std;
class MyClass{
public:
MyClass();
MyClass(string note, const string mName = "DEFAULT_NAME");
~MyClass();
private:
string myName;
string myNote;
};
MyClass::MyClass(){
myName = "default constructor without argument";
myNote = "";
cout << "MyClass Constructor: " << myName << endl;
}
MyClass::MyClass(string note, const string mName){
myName = mName;
myNote = note;
cout << "MyClass Constructor: " << myName << " : " << myNote << endl;
}
MyClass::~MyClass(){
cout << "MyClass Destructor: " << myName << endl;
}
int main()
{
MyClass myClass1;
MyClass myClass2("Using default Name");
MyClass myClass3("with name", "MyClass 3");
return 0;
}
標籤:
exercise
Sunday, September 11, 2011
Constructor and Destructor
example:
#include <iostream>
using namespace std;
class MyClass{
public:
MyClass(string mName);
~MyClass();
private:
string myName;
};
MyClass::MyClass(string mName){
myName = mName;
cout << "MyClass Constructor: " << myName << endl;
}
MyClass::~MyClass(){
cout << "MyClass Destructor: " << myName << endl;
}
int main()
{
cout << "Hello world!" << endl;
MyClass myClass("MyClass 1");
MyClass* myClassPtr = new MyClass("MyClass 2: created using new");
delete myClassPtr;
return 0;
}
標籤:
exercise
Array arguments are passed to function by reference
example:
#include <iostream>
using namespace std;
void function(int ArrayPassed[], unsigned len);
int main()
{
int array[] = {1, 2, 3, 4, 5};
unsigned length = 5;
cout << endl << "before fnction()" << endl;
for(unsigned i = 0; i < length; i++){
cout << array[i] << " ";
}
function(array, length);
cout << endl << "after fnction()" << endl;
for(unsigned i = 0; i < length; i++){
cout << array[i] << " ";
}
cout << endl;
return 0;
}
void function(int ArrayPassed[], unsigned len){
for(unsigned i = 0; i < len; i++){
ArrayPassed[i] *= ArrayPassed[i];
}
}
標籤:
exercise
Pass argument to function by value and by reference
example:
#include <iostream>
using namespace std;
void function(int byValue, int& byRef);
int main()
{
int a = 5;
int b = 10;
cout << endl << "before fnction()" << endl;
cout << "a (byValue) = " << a << endl;
cout << "b (byRef) = " << b << endl;
function(a, b);
cout << endl << "after fnction()" << endl;
cout << "a (byValue) = " << a << endl;
cout << "b (byRef) = " << b << endl;
return 0;
}
void function(int byValue, int& byRef){
byValue++;
byRef++;
}
標籤:
exercise
break and continue
example:
#include <iostream>
using namespace std;
int main()
{
cout << endl << "the loop break when i = 5" << endl;
for(int i = 1; i < 10; i ++){
if (i == 5) break;
cout << i << endl;
}
cout << endl << "the loop skip 5 with continue" << endl;
for(int i = 1; i < 10; i ++){
if (i == 5) continue;
cout << i << endl;
}
return 0;
}
標籤:
exercise
Saturday, September 10, 2011
bool test ? true : false
#include <iostream>
using namespace std;
int main()
{
cout << (true ? "It's True" : "It's False") << endl;
cout << (false ? "It's True" : "It's False") << endl;
return 0;
}
Friday, September 9, 2011
Thursday, September 8, 2011
References
#include <iostream>
using namespace std;
int main()
{
string name = "Eric L";
string& refName = name;
cout << refName << endl;
refName = "Changed!";
cout << refName << endl;
cout << name << endl;
return 0;
}
標籤:
exercise
Test of string
#include <iostream>
using namespace std;
int main()
{
string a = "Hello";
string b = "World!";
string c = a + b;
cout << c << endl;
cout << "c.size() = " << c.size() << endl;
for(unsigned i = 0; i < c.size(); i++){
cout << "c[" << i << "] : " << (char)c[i] << endl;
}
return 0;
}
標籤:
exercise
Sunday, September 4, 2011
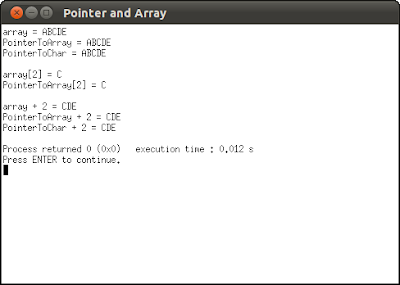
Pointer and Array
#include <iostream>
using namespace std;
int main()
{
char array[] = {'A', 'B', 'C', 'D', 'E'};
char* PointerToArray = array;
char* PointerToChar = &array[0];
cout << "array = " << array << endl;
cout << "PointerToArray = " << PointerToArray << endl;
cout << "PointerToChar = " << PointerToChar << endl;
cout << endl;
cout << "array[2] = " << array[2] << endl;
cout << "PointerToArray[2] = " << PointerToArray[2] << endl;
cout << endl;
cout << "array + 2 = " << array + 2 << endl;
cout << "PointerToArray + 2 = " << PointerToArray + 2 << endl;
cout << "PointerToChar + 2 = " << PointerToChar + 2 << endl;
return 0;
}
標籤:
exercise
VISUAL C++ 2010 EXPRESS: Free tools to create applications on Windows using Visual C++
Visual C++ 2010 Express is part of the Visual Studio 2010 Express family, a free set of tools that Windows developers at any level can use to create custom applications using basic and expert settings. Visual C++ is a powerful language that is designed to give you deep and detailed control when you build either native Windows (COM+) applications or .NET Framework managed Windows applications.
link:
- Visual C++ 2010 Express
Saturday, September 3, 2011
Size of data
#include <iostream>
using namespace std;
int main()
{
cout << "sizeOf(bool) = " << sizeof(bool) <<endl;
cout << "sizeOf(short) = " << sizeof(short) <<endl;
cout << "sizeOf(int) = " << sizeof(int) <<endl;
cout << "sizeOf(long) = " << sizeof(long) <<endl;
cout << "sizeOf(float) = " << sizeof(float) <<endl;
cout << "sizeOf(double) = " << sizeof(double) <<endl;
cout << "sizeOf(char) = " << sizeof(char) <<endl;
cout << "sizeOf(void) = " << sizeof(void) <<endl;
cout << "sizeOf(NULL) = " << sizeof(NULL) <<endl;
cout << "sizeOf(void *) = " << sizeof(void *) << " - (pointer)" << endl;
return 0;
}
Please notice that the size of data type are machine/system dependance!
標籤:
exercise
Get integer value of char
The function int(c) returns the integer value associated with a character variable c.
#include <iostream>
using namespace std;
int main()
{
for (char i = 'A'; i <= 'Z'; i++){
cout << i << " : " << int(i) << endl;
}
for (char i = 'a'; i <= 'z'; i++){
cout << i << " : " << int(i) << endl;
}
return 0;
}
標籤:
exercise
Thursday, September 1, 2011
Bubble Sort
#include <iostream>
#include <cstdlib>
using namespace std;
void bubblesort();
void swap(int *p1, int *p2);
int data[10];
int main () {
//Prepare data
for (int i = 0; i < 10; i++) {
data[i] = rand() % 100;
}
cout << "data before bubble sort:" << endl;
for (int i = 0; i < 10; i++)
cout << data[i] << " ";
bubblesort();
cout << "data after bubble sort:" << endl;
for (int i = 0; i < 10; i++)
cout << data[i] << " ";
return 0;
}
void bubblesort() {
int i, j, min;
int size = sizeof(data)/sizeof(int);
cout << endl << "size = " << size << endl;
for(i = 0; i < size - 1; i++) {
min = i;
for (j = i + 1; j < size; j++){
if (data[j] < data[min])
min = j;
}
if (i != min){
int tmp = data[i];
data[i] = data[min];
data[min] = tmp;
}
}
}
標籤:
exercise
Subscribe to:
Posts (Atom)